Showing posts with label textures. Show all posts

Wednesday, May 18, 2011

Create a dramatic image by adding a texture layer...

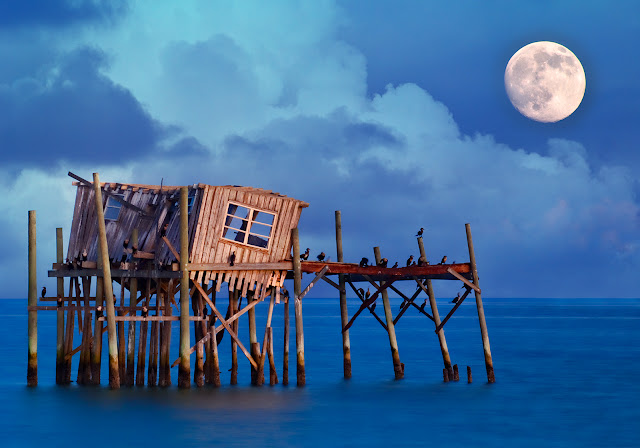
One of my favorite ways  to add drama, depth and definition to a photo is to add a texture layer to the original image. A texture layer can be as simple as another photograph that you have taken, clouds, aged peeling painted walls, flowers, granite, anything goes. I like to photograph textures everywhere I go and keep them handy for creative work. The examples in this blog post have the same cloud texture so you can see how different the clouds look with a variety of photos. This is really fun to do!

The first example started with an in-camera double exposure taken with my Nikon D3s in Cedar Key, Florida of an old fishing shack and the moon. There were no clouds in sight the evening I was shooting, so I added one of my favorite cloud textures later in Photoshop. 

Layering is very easy... 
  • Cmd/Ctrl A to select the texture layer. 
  • Cmd/Ctrl C to copy it.  
  • Cmd/Ctrl V to paste into the background document (your original image). 
  • Choose a Blend Mode to layer the two images together, such as Overlay or Multiply.
  • Tip - Hold down the Shift key and press the plus/minus key to scroll through blend modes. 
You can also drag the cloud layer over to your background layer, holding down the shift key to align the texture layer with your original image. I used the Transform tool to vary the clouds slightly in each of the photographs. Don't hesitate to modify a texture layer to suit your image. You can also rotate or flip your texture layer, alter the hue and saturation or convert it to black and white, adjust the opacity, anything goes!

The same clouds added a cinematic touch to this photograph taken in St. Augustine. One of the colorful filters in Nik Color Efex Pro accentuated the gold tones throughout the image. The same clouds were added to the landscape image below which creates a pastel look in a previously empty sky.

For fun, I added the same layer of clouds to create a stormy sky look to the airplane image below. The image was converted to black and white with Nik Silver Efex Pro 2. The clouds here look very dramatic having more contrast compared to the landscape example. To give you an idea of what you might photograph to create your own textures, I've included a few screenshots at the end of this post. You can also start your collection right way by using my favorite Flypaper Textures. I also cover textures in the classes I teach at BetterPhoto.com, both Enhancing Images and also Infrared Photography. Hope you can join me next month. Classes start June 8th, I hope to see you there! Make great pictures... ~ Deb  


Thursday, April 21, 2011

Texturing to add depth and drama...

I have an ongoing love of photographing bicycles everywhere I go! It's sort of a personal thematic type project that I add to from my travels or everyday journeys. I like old bikes, the older the better, the more "personality"and character they seem to acquire from years of use and travel. This bicycle was photographed against an aging stucco wall that was divided in color, the two tones made for a graphic image. To enhance the aged look, I layered the bicycle photo with another photo of texture that I photographed near the same location. Have fun with textures, shoot your own, and start a collection! ~ Deb

PS - No textures? Click here to visit Flypaper Textures or Totally Rad Dirty Pictures!

Monday, February 28, 2011

A touch of Spring - Adding texture to a photograph for a painterly effect...

Layering textures with a photograph can create an expressive image reminiscent of a painting. This solitary tree photograph was layered with several textures from Flypaper Textures which created the brushstrokes of color look. Texture adds a little definition and detail throughout an image. No clouds, no worries, empty skies work well for textured effects!

The key for adding texture is to find a blend mode that will work for the images. Copy and paste (or drag) the new texture layer over your original photograph layer, and find a complementary blend mode by scrolling through each Blend Mode. Here's how you do it... With the move tool active, hold down the shift key and press the plus or minus key to see the various effects Blend Modes have on your image. Soft light was used for this combination. Nik Viveza was used to selectively tone down, brighten up  and add color to areas in the image. The artistic edge treatment that pulls the image together is PhotoFrame from OnOne Software. Make great pictures! ~ Deb

PS - Coupon codes are always in the sidebar, including links to software you might want to try. Totally Rad Dirty Pictures will set up your texture layer (including Flypaper and your own favorites) with your photo automatically, and assign a blend mode, how cool is that? Try it and see!

Monday, January 24, 2011

#South Beach Lifeguard Stands with artistic textures and borders...

This started as a singular long exposure before sunrise on beautiful South Beach in Miami, FL. There are quite a few of these lifeguard stands that are manned during the daytime hours to protect beach goers. Before the sun actually rose, the sky was violet with a pink hue and I wanted to work with this idea a bit in Photoshop to create a fun and painterly look.

I used several layers of texture to create the look in this image. I started with Lavender Skies and a blend mode of Overlay, and used a second texture, Brushed Rose with a blend mode of Hard Light. A Hue/Saturation adjustment layer was added to sway the colors in the texture to a more violet and purple hue, very easy to do from the Adjustment Panel in Photoshop.

The textures were brought out with the various blend modes and complemented the life guard stand nicely. From the Layers Palette, you can scroll through the various blend modes to see the effect each has on your image by making sure the Move tool is active, and holding down the Shift and the plus or minus key. The textures used here are from Flypaper and they are truly one of my favorites of textures to work with. Try them and see why! Click here to visit Flypaper Textures.

This was a lot of fun to create, and the finishing touches work out beautifully by using a canvas looking edge treatment by Jack Davis from OnOne PhotoFrame. This filter set has every edge treatment, border, frame, embellishment, and overlay available, to make the perfect picture.  OnOne PhotoFrame... you can use coupon code DEBSANDIDGE. Interested to know more about enhancing your images? Join me in class next month at BetterPhoto.com  - I hope to see you there!

Sunday, November 28, 2010

Parts Dept... #HDR, Wide angle lenses and Textures...


Wide angle lenses work beautifully for many compositions, including this HDR image photographed in the "Parts Dept" of this vintage auto store. A Nikon14-24mm lens takes in all the interesting features in the scene, while HDR enhanced the details, color and exposure, down to the last lightbulb. It's like opening a present to see the result of images processed for HDR!

I also like to add textures to my images, such as the texture in the wide angle HDR photo below. Texture adds depth and dimension, giving an image more character. One of my favorite textures was photographed in Charleston, SC - an aged cracked and peeling painted wall that has wonderful golden tones. You can experiment with blend modes and a texture layer. With the Move tool active, hold down the shift key and press the plus or minus key to scroll through the various blend modes and see the effect each has on your image.

Sounds like fun? Perfect! Join me and a great group of students from around the world for Photoshop - Enhancing Images & Creating Works of Art starting Wednesday December 8th. I can't wait to get started, we cover everything creative in my online course at BetterPhoto, and the best thing is, you can learn in your pajamas. My other course, Infrared Photography also starts December 8th and will be a lot of fun too. Interested in Vintage camera and film effects? Coming soon... I hope to see you in class! ~ Deb

PS - Students and workshop attendees, email me for a 20% discount on Photomatix, and for anything Nik Software using coupon code DSANDIDGE.

Thursday, October 14, 2010

Add Artistry to your Image with Textures...


A simple way to add depth and drama to your photo is to add a layer of texture or two, or in this case, three. Hover your mouse over the image to see the original. I found several textures that I liked and used them to enhance this photo of palm trees after sunset. The texture layers give the image depth and drama, and make it a little more artistic.

To blend a texture layer with your image, use a blend mode that suits your photo. Adjust the opacity of the texture layer to suit your image. I liked the textures, however one of the colors wasn't working for the image. I used a Hue Saturation adjustment layer to sway the hue to a flattering color. You can also remove the color from a texture, which works well too. Blend modes of overlay and soft light were used with the textures and a beautiful edge treatment from OnOne Photoframe provided the perfect finishing touch. Make great pictures!

Wednesday, August 25, 2010

A Vintage Find...


I had fun with this iPhone photo and a few photo apps! It created just the look I had mind, aged, worn, yet   focusing the attention on the serene and smiling statue. This was photographed at an antique store and the last thing I had in mind was to end up with a perfect digital file. I wanted the photo to look like a treasure from days past.  I used two cool apps that are my favorites, Hipstamatic which worked with the green tones in the image, and also Pic Grunger, which does just that - makes it grungy in a variety of styles. I like the yellowed scratchy edge treatment, it makes the photo look real.

Want to create digital Lo-fi (low-tech coolness) with your dSLR camera? How about vintage film and beautiful texture effects with a painterly look? Stay tuned! New 4 week course coming soon!  We'll cover everything from  Pictorialism to Polaroids. To get an idea of the retro look, check out my Photo a Day. It's all about vintage Lo-fi imagery!  Hope to see you there, I'll keep you posted!

PS - This is an iPhone picture and if I wanted to resize and print it larger, I would use Genuine Fractals 6 Professional Edition. At this moment and until August 6, Genuine Fractals Professional Edition is available for $140 off with this code... DEB6

Tuesday, August 17, 2010

A little romance...


Window dressings in antique stores provide wonderful photographic opportunities. Lace, flowers, and a vintage dress, a romantic find! I liked the vintage look inside the window and thought it would be fun to create a photo that looked like it was taken long ago. To create a nostalgic look, I added several layers of texture and used a "film" preset in Alien Skin Exposure 3 called Autochrome. The grain, texture and slightly faded look adds a little more depth to the digital image making it appear antique.

For street photography, including "window shopping" I use a mid range zoom on my camera and have it out and ready to shoot. Auto ISO comes in very handy for shooting in various light conditions. I also enable Active D Lighting enabled (Nikon) which boosts the mid tones and evens out the contrast in the highlight and shadow areas, creating a better balanced exposure. Aperture priority mode gives me choices on how I want to interpret my subject. Focusing on the subject with a wide aperture allows the  background to fall into a soft blur which helps define the dress. Make great pictures!

Thursday, July 29, 2010

Love...

I like the message painted graffiti style that I found in San Francisco, California. It's colorful, creative, and I wanted to expand on the idea of painting by using a few creative techniques in Photoshop. I like Snap Art Stylize. It removes detail and adds marker type black lines in the composition. I added several layers of texture for a watercolor type look for more depth. The finishing touch was a layer of Rustic Grunge from Action FX that blends beautifully with the image, creating another subtle layer of interest with leaf and rose patterns. The element of adding textures can enrich and enhance an image, creating an entirely new look, plus it's just fun.  Make great pictures!

Saturday, July 17, 2010

A different view...


Different weather conditions, time of day, points of view, the San Francisco Bay Bridge offers the photographer endless ways to portray it. One of my favorite ways is photograph at twilight, with a vivid blue sky and lights shining from the bridge. Setting up well before twilight allowed me to take advantage of sunset too. This version is more delicate and painterly than a dramatic sunset or night sky, different from what I originally had in mind. When I saw the bridge in the soft light of a fading sunset, I thought about how it might look if it was painted. Adding several layers of texture helped create the look I had in mind. Make great pictures...