Snap Art is perfect for a variety of subjects from landscapes, and cityscapes, to portraits and pets. You can use this promotional code for Snap Art, and anything Alien Skin DEB0902. I teach a segment on Snap Art in one of my online courses at BetterPhoto.com, it's one of my favorite parts of the lessons. Hope you will join us, classes start in August. Be an artist with Snap Art! ~ Deb
Showing posts with label BetterPhoto courses. Show all posts
Saturday, July 23, 2011
Turn photos into works of art with Snap Art...
Snap Art is perfect for a variety of subjects from landscapes, and cityscapes, to portraits and pets. You can use this promotional code for Snap Art, and anything Alien Skin DEB0902. I teach a segment on Snap Art in one of my online courses at BetterPhoto.com, it's one of my favorite parts of the lessons. Hope you will join us, classes start in August. Be an artist with Snap Art! ~ Deb
Tuesday, July 12, 2011
Converting Imagery to Black and White, Seaplanes in Vancouver...
Black and white photography allows the viewer to connect with elements of an image without the connotations, or the power of color. This allows the story of an image to be presented in a beautiful way that has timeless appeal. The visual narrative of the composition can become clearer, allowing features such as light, shadow, texture and tonality to shine through. Try it and see! An image that isn't quite connecting with you in color, may have more impact in black and white. My favorite black and white conversion method is Nik Silver Efex Pro. I recommend it for students in my infrared photography courses, presentations and workshops, because it provides the most control and creative options. I can't get past how easy is it to use Control Points to target selective adjustments!
These images are from a de Havilland seaplane photographed in Vancouver, BC, Canada. I had the pleasure of sitting in the co-pilots seat which was an absolute blast! The last image is a hand held HDR of the interior of the seaplane, merged with Nik HDR Efex Pro, and converted with Nik Silver Efex Pro. I braced the camera to be able to make multiple exposures, which worked for tight quarters like this cockpit.You can use promotional code DSANDIDGE for everything Nik. Have fun shooting!

Friday, May 20, 2011
Nik Radio and Deborah Sandidge talk Infrared...
Recently, I had the pleasure of being interviewed by super host of Nik Radio, Scott Sheppard! It was a lot of fun! We had a wonderful discussion about infrared photography, different filter choices that are available for infrared conversion, camera conversion options, compact vs. dSLR, and about my workflow for infrared images. Scott was interested in my book Digital Infrared Photography, and also about some of the courses I teach at BetterPhoto.com. We also talked about HDR and other fun stuff too! You can listen to the interview right now, it's up and running on iTunes! Click on Pro Talk with Deborah Sandidge.
Have a wonderful weekend! ~ Deb
Wednesday, May 18, 2011
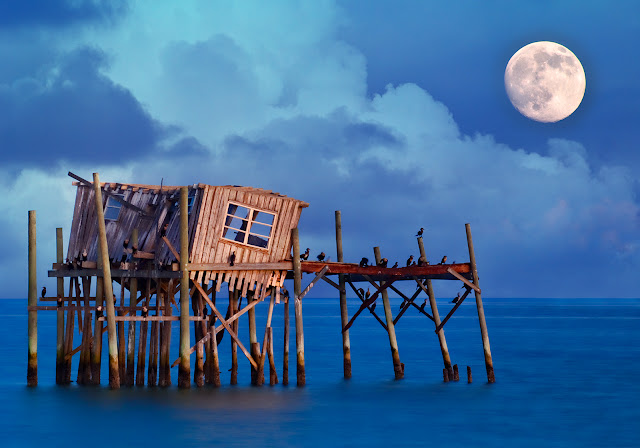
Create a dramatic image by adding a texture layer...

One of my favorite ways to add drama, depth and definition to a photo is to add a texture layer to the original image. A texture layer can be as simple as another photograph that you have taken, clouds, aged peeling painted walls, flowers, granite, anything goes. I like to photograph textures everywhere I go and keep them handy for creative work. The examples in this blog post have the same cloud texture so you can see how different the clouds look with a variety of photos. This is really fun to do!
The first example started with an in-camera double exposure taken with my Nikon D3s in Cedar Key, Florida of an old fishing shack and the moon. There were no clouds in sight the evening I was shooting, so I added one of my favorite cloud textures later in Photoshop.
Layering is very easy...
- Cmd/Ctrl A to select the texture layer.
- Cmd/Ctrl C to copy it.
- Cmd/Ctrl V to paste into the background document (your original image).
- Choose a Blend Mode to layer the two images together, such as Overlay or Multiply.
- Tip - Hold down the Shift key and press the plus/minus key to scroll through blend modes.
For fun, I added the same layer of clouds to create a stormy sky look to the airplane image below. The image was converted to black and white with Nik Silver Efex Pro 2. The clouds here look very dramatic having more contrast compared to the landscape example. To give you an idea of what you might photograph to create your own textures, I've included a few screenshots at the end of this post. You can also start your collection right way by using my favorite Flypaper Textures. I also cover textures in the classes I teach at BetterPhoto.com, both Enhancing Images and also Infrared Photography. Hope you can join me next month. Classes start June 8th, I hope to see you there! Make great pictures... ~ Deb
Monday, May 9, 2011
At the beach... Create an artistic look with Topaz Labs Simplify
Creating an artistic look with a photo can be as easy as using a filter or plug-in for Photoshop, Elements or Lightroom. With this seagull and beach scene, I used Topaz Labs Simplify, a very creative plug-in for creating brushstrokes of color. Simplify removes some of the detail, which in turn creates a more artistic image. The colors can be accentuated as shown with the seagull photo above. There are quite a few presets for Simplify; BuzzSim, cartoon, various painterly looks, color sketch, underpainting which is great for creating a base to further paint an image, woodcarving and more!
With the seagull image, I used BuzzSim which is one of my favorites of the Simplify presets. This preset removes some of the detail and softens the image, accentuating the overall colors. Removing some of the detail creates a more tranquil look which works nicely for this beach scene subject matter. I like the pastel look the preset created, just the idea I had in mind for this image!
To enhance the artistic look, you can use a canvas background to create a little texture. Try using one of the textures found in Patterns in Photoshop (Artist's Surfaces) and use a Blend Mode to blend the two, such as Overlay or Multiply. You can also use your own texture, my favorites are from Flypaper Textures! As a finishing touch, I used an edge treatment from OnOne Photoframe that resembles canvas and brushstrokes.
All links and promotional codes to software can be found by clicking on my Plug-in page.
If you would like to join me for a little creativity, my online classes for this month are just getting started! Click here for more information on Enhancing Images online at BetterPhoto.com. Have fun creating an artistic look with your photos! ~ Deb
With the seagull image, I used BuzzSim which is one of my favorites of the Simplify presets. This preset removes some of the detail and softens the image, accentuating the overall colors. Removing some of the detail creates a more tranquil look which works nicely for this beach scene subject matter. I like the pastel look the preset created, just the idea I had in mind for this image!
To enhance the artistic look, you can use a canvas background to create a little texture. Try using one of the textures found in Patterns in Photoshop (Artist's Surfaces) and use a Blend Mode to blend the two, such as Overlay or Multiply. You can also use your own texture, my favorites are from Flypaper Textures! As a finishing touch, I used an edge treatment from OnOne Photoframe that resembles canvas and brushstrokes.
All links and promotional codes to software can be found by clicking on my Plug-in page.
If you would like to join me for a little creativity, my online classes for this month are just getting started! Click here for more information on Enhancing Images online at BetterPhoto.com. Have fun creating an artistic look with your photos! ~ Deb
Saturday, February 26, 2011
Tell twice the story with a reflection...
Tell twice the story with your photograph by creating a watery reflection! This technique can enhance your image and make it look more dimensional. This is one of many techniques that I teach in my classes at BetterPhoto.com! Both the shore and the bird were photographs converted to silhouettes, and the rest of the image was fabricated for fun in Photoshop! This is part of tutorial I wrote for Photoshop Creative magazine. Here's how you can create a reflection in Photoshop...
- Select your image, Cmd/Ctrl A, and copy Cmd/Ctrl C. Cmd V to paste.
- Rotate the image, Rotate Canvas>Flip Vertical (it will look upside down).
- Increase the size of your original image by about double. Go to Image>Canvas Size and click on the top center square and type in the new size in the height field.
- Drag new rotated "reflection" to mirror your existing image.
- You can also create a rippled effect by choose Filter>Distort> Ocean Ripple.
- Merge the layers, Cmd/Ctrl E.
Another easy and fast way, and my favorite method, is to use the Flood Filter from Flaming Pear. This is the technique shown in the shorebird image above. I use the crop tool to roughly extend the canvas area, and then choose one of the cool effects in Flood. This filter has unlimited variations on waviness, complexity, brilliance and blur. You can also "roll the dice" for a random effect. These techniques for reflections can make a beautiful difference with your images. Get creative this weekend! ~ Deb
Friday, February 11, 2011
Broaden your photographic horizons, shoot infrared!
Your imagination is your preview of life's coming attractions. ~Albert Einstein
Infrared photography can give you a new outlet for artistic expression by allowing you to shoot traditional subjects in novel and interesting ways. A color photograph converted to black and white is quite different from a black and white infrared image. Nothing can quite compare with the surreal factor of bright white foliage, a dark sky and the uniqueness of how infrared light is reflected and absorbed by different surfaces. Infrared photography is a wonderful way to broaden your photographic horizons and expand your creativity!
Interested in learning more? Please check out my book Digital Infrared Photography published by Wiley, available at bookstores and online at Amazon. I also teach Infrared Photography at BetterPhoto.com. I'll be speaking about infrared in April at Florida's Birding and Photo Fest, and in June in Ontario for the Canadian Camera Conference. I hope to see you at one of these events!
My favorite method of black and white conversion is Nik Silver Efex Pro. It creates beautiful black and white images that are perfect for both infrared and color photography. For museum quality black and white printing, try Digital Silver Imaging. Make great pictures! ~ Deb
Monday, February 7, 2011
A little romance... with Alien Skin Snap Art
What lies behind us, and what lies before us are tiny matters compared to what lies within us.
~ Ralph Waldo Emerson
Italy is a very romantic place! Outdoor cafes everywhere, candles, flowers even on the coldest of days. I liked this couple walking arm in arm and couldn't resist taking their picture walking under a canopy of blue stars. The scene looked as if it could be a artistic painting rather than just a photograph. To complete the idea, I used Oil Paint in Alien Skin Snap Art which creates wonderful brushstrokes of color throughout the image. We will be covering this technique in my 4 week online course Enhancing Images and Creating Works of Art at BetterPhoto.com. There is still time to sign up and join the fun! Make great pictures. ~ Deb
Sunday, November 28, 2010
Parts Dept... #HDR, Wide angle lenses and Textures...
Wide angle lenses work beautifully for many compositions, including this HDR image photographed in the "Parts Dept" of this vintage auto store. A Nikon14-24mm lens takes in all the interesting features in the scene, while HDR enhanced the details, color and exposure, down to the last lightbulb. It's like opening a present to see the result of images processed for HDR!
I also like to add textures to my images, such as the texture in the wide angle HDR photo below. Texture adds depth and dimension, giving an image more character. One of my favorite textures was photographed in Charleston, SC - an aged cracked and peeling painted wall that has wonderful golden tones. You can experiment with blend modes and a texture layer. With the Move tool active, hold down the shift key and press the plus or minus key to scroll through the various blend modes and see the effect each has on your image.
Sounds like fun? Perfect! Join me and a great group of students from around the world for Photoshop - Enhancing Images & Creating Works of Art starting Wednesday December 8th. I can't wait to get started, we cover everything creative in my online course at BetterPhoto, and the best thing is, you can learn in your pajamas. My other course, Infrared Photography also starts December 8th and will be a lot of fun too. Interested in Vintage camera and film effects? Coming soon... I hope to see you in class! ~ Deb
PS - Students and workshop attendees, email me for a 20% discount on Photomatix, and for anything Nik Software using coupon code DSANDIDGE.
Labels:
BetterPhoto courses,
HDR,
textures
Tuesday, August 31, 2010
Round Out Your Photography - Shoot Infrared...
One of the most wonderful things about photography is that you have so many destinations to explore. There's something new and different just waiting for you to discover! I've always had a passion for infrared photography. The way light is interpreted by the camera and infrared filter is just beautiful. This photo was taken with an infrared converted camera (standard R72 type filter modification). There are several conversion choices for color effects, however the classic black and white imagery remains my favorite. An infrared image is very different from a color image that has been converted to black and white. Foliage in infrared is generally interpreted as white because it is reflective of infrared light. If this was a color image converted to black and white, the foliage would look gray. Infrared light can be magical, a whole new world!
I hope to see you in my BetterPhoto.com Infrared Photography course coming up Wednesday September 8th! There is already a great group signed up, so don't miss the fun! If you would like to read up on infrared, you can find my book, Digital Infrared Photography at local bookstores or online at Amazon. I'll be giving a workshop here in Orlando in October, and also in New Mexico with Naturescapes in December. Events are posted in the sidebar of my blog along with Photoshop plug-in coupon codes. Don't forget you can use code DEB at Life Pixel for infrared camera conversion. Make great pictures... in infrared! ~ Deb
Tuesday, August 3, 2010
Secret Garden...
This HDR image was photographed at the Mission in San Juan Capistrano, California. The Mission is a photographically rich location, and an overall beautiful place to experience. This archway leading to a fountain created a perfect opportunity to shoot in HDR during the bright sun of mid afternoon. The image was processed with Photomatix and a texture layer was added for a painterly touch. (Email me for a great Photomatix discount).
We work with textures in my online courses that starts tomorrow at BetterPhoto.com. Textures are a wonderful way to enhance your imagery. I also use texture layers with my infrared photography, which adds richness and depth. Classes are filling up quickly, and there's one more day left for the $20 off course coupon! Enter Summer20 in the gift card code field.
I hope to see you in class tomorrow...
Join the fun!
Labels:
BetterPhoto courses,
HDR,
Photomatix
Friday, July 30, 2010
Guest Blogger Friday...
I'd like to share with you the work of photographer and artist, Bob Gottfried. I was impressed by his creativity with an image that he transformed from the photograph below. Bob went from snapshot to work of art with a little artistry in Photoshop! The image has a bit of a nostalgic mood with the illustrative and sepia toned background, and the streetcar has a hand painted look that I find very compelling! Below are Bob's notes on how he worked with the image...
"I started with a photo of a streetcar in downtown Toronto. After some basic tweaking (Photoshop, mainly curves and cropping) I used Alien Skin Art presets (I played with the different presets until I got the desired result). For the background I used an illustrative style, then I dimmed it a bit and turned it into Sepia. For the Streetcar, I used a larger paint brush and reduced transparency by about 40%. At the end I used curves again to get the final photo."
PS - Hope to see you in one of my BetterPhoto.com courses, starting in August!
Monday, June 28, 2010
Taming Dragons in Photoshop...
You can easily create a new look for an image by using a little creativity in Photoshop! The colors of this urban art dragon were inverted in Photoshop (Control/Command I) and then softened with Topaz Adjust Portrait Smooth for a painterly look. The image below shows the original dragon colors.
If you really want to have fun with color, alter the Hue by making a Hue Saturation adjustment layer! For the purple dragon below, I inverted the original and adjusted Hue to create a new look. An adjustment in Hue gives you control over colors, and can make a very different interpretation of the original image.
We do this, and more in my four week online course, Photoshop - Enhancing Images and Creating Works of Art at Betterphoto.com. Classes start in July! I hope to see you there!
Tuesday, May 25, 2010
Expand your creativity, shoot infrared!
Years ago, I started out by using an infrared filter on the lens of my camera. This required setting up the camera on a tripod, composing the scene, attaching the filter to the lens for each shot. The filter is too dark to see through once mounted on the lens. Having a digital camera converted to infrared allows you to take pictures just like a "color" camera. The really great thing about photographing in infrared is that you have several filter choices. You can create beautiful traditional black and white infrared images or photos in infrared with a little color like the dancing apple tree above.
Summer is the perfect time for infrared photography! Want to have fun and learn more? Please join me for my online course, Digital Infrared Photography at BetterPhoto.com starting Wednesday, June 9th. Hope to see you there!
Thursday, March 11, 2010
Infrared Dreams...
Infrared photography offers the photographer limitless options in creativity. This image was captured in infrared using the new super color infrared filter (590nm). This filter offers the most vivid and beautiful colors, while retaining the classic features of infrared photos. A simple texture background was added for depth and dimension. Topaz Adjust 4 works beautifully to enhance texture, and brings out small details in infrared images. I especially like the "Feature Enhancement" preset with this image. There's only a few days left on the coupon codes, newadjust for Adjust 4 and for the Topaz bundle, adjustup. By the way, my BetterPhoto.com courses start this week... Photoshop - Enhancing Images & Creating Works of Art, and Digital Infrared Photography! There is still time to sign up. I hope to see you there! ~ Deb
Monday, March 1, 2010
Topaz Adjust 4... New!
Check out the new Topaz Adjust 4! This is the latest version of everyone's favorite Photoshop plug-in. If you haven't tried it, now is your chance to take advantage of a fantastic photo editing tool. This is the effect you might have noticed in beautiful photos and wondered just how it was accomplished. To make your photos "pop"- it's the plug-in that will make a big difference in your photography.
If you already have Topaz Adjust 3, the upgrade is free for you! If you want to purchase it, now's the time and here's your coupon code - newadjust. (You'll save $15) and have fun with the new presets included.This code is only effective March 1 - 15 however. If you would like to get the Topaz Bundle, use this code - adjustup. You'll save $30 towards the this excellent set of tools, including Adjust, Simplify, Clean, DeNoise, Remask, Detail, and DeJPEG.
Take a look at the new user interface, very clear and easy to use... Here, I chose Photo Pop to subtly enhance the color and detail in my image. Do try Spicify, it's another one of my favorites! See below.
You can create a variety of effects by using Topaz Adjust 4. I use and recommend everything Topaz! Clean 2 creates wonderful effects (browse through my past blog posts to get an idea. Have fun working with everything Topaz! Please send me your photos, I'd love to see what you are creating!
I use Topaz Adjust in a variety of ways as part of my work flow with both color and infrared photography. Want to work a little more with this idea? Join me for one of my online BetterPhoto.com courses starting March 10... Photoshop - Enhancing Images and Creating Works of Art, or Digital Infrared Photography. Hope to see you there!
~ Deb
If you already have Topaz Adjust 3, the upgrade is free for you! If you want to purchase it, now's the time and here's your coupon code - newadjust. (You'll save $15) and have fun with the new presets included.This code is only effective March 1 - 15 however. If you would like to get the Topaz Bundle, use this code - adjustup. You'll save $30 towards the this excellent set of tools, including Adjust, Simplify, Clean, DeNoise, Remask, Detail, and DeJPEG.
Take a look at the new user interface, very clear and easy to use... Here, I chose Photo Pop to subtly enhance the color and detail in my image. Do try Spicify, it's another one of my favorites! See below.
You can create a variety of effects by using Topaz Adjust 4. I use and recommend everything Topaz! Clean 2 creates wonderful effects (browse through my past blog posts to get an idea. Have fun working with everything Topaz! Please send me your photos, I'd love to see what you are creating!
I use Topaz Adjust in a variety of ways as part of my work flow with both color and infrared photography. Want to work a little more with this idea? Join me for one of my online BetterPhoto.com courses starting March 10... Photoshop - Enhancing Images and Creating Works of Art, or Digital Infrared Photography. Hope to see you there!
~ Deb
Subscribe to:
Posts (Atom)