Showing posts with label Nik Color Efex Pro. Show all posts

Friday, June 10, 2011

Tips for capturing the best photos at twilight...

Twilight is my favorite time to take pictures, the sky is absolutely magical in Vancouver, British Columbia, Canada! Twilight lasts for a short time, it's key to be be ready and in place for pictures! This was actually my parting shot. I didn't want to leave, the scene was incredibly beautiful to me. It's tricky shooting anchored boats. As other boats pass by, the ripples from the water are magnified into big waves that I had to just wait out. I liked the mirror perfect reflections caused by the long exposure and great weather conditions. There is slight movement with some of the boats in the photo, but it adds to the realism, and I'm happy with the end result!

How to shoot at twilight:
  • Scout out locations first.  It's easier to find potential compositions before the sun goes down.
  • Exposures will be long, you'll need a sturdy tripod. I use a Feisol CT-3442 which weighs 2.31 lbs and folds down to 19 inches. Perfect for travel and everyday use.  
  • Keep it level. Use Live View or place a bubble level on the hotshoe of your camera,
  • Cable release or self timer feature. The exposure was 60 seconds long, the Bulb feature helped with the timed exposure. I shot this with the Nikon D7000 that I'm giving a whirl for travel, along with the Nikon 28-300mm lens. Beautiful combination, and this lens is fabulous on the D3s!  
  • White balance.  Try starting with 4000K, or Daylight (5000K) to see how it looks with your scene. White balance isn't etched in granite, you may like the look of a given setting although it's not "technically correct." Experiment, and see what works best for your composition.
  • Manual exposure. Set the aperture for the desired depth of field, and decide how long the exposure will need to be. You may even want to make a series of exposures for HDR. Or, think about putting together a panorama of the scene!
  • Wait for the "blue hour." You may want to shoot during and after sunset, then wait for beautiful blue quality of balanced light in between daylight and darkness.
  • There's an app for that. Light Tracker, Helios, Velaclock, Sunrise & Set, and for tracking stars on the iPad try Sky Walk. 
  • Lost the light, no worries. Go for a classic black and white image with Nik Silver Efex Pro 2!
  • Be inventive. Think about creative lens choices or angles, Make your shot different and unique!
Have fun shooting! I hope to see you in a future seminar, workshop or online course. You can check my Event's page to see what's coming up next. ~ Deb

Wednesday, May 18, 2011

Create a dramatic image by adding a texture layer...

One of my favorite ways  to add drama, depth and definition to a photo is to add a texture layer to the original image. A texture layer can be as simple as another photograph that you have taken, clouds, aged peeling painted walls, flowers, granite, anything goes. I like to photograph textures everywhere I go and keep them handy for creative work. The examples in this blog post have the same cloud texture so you can see how different the clouds look with a variety of photos. This is really fun to do!

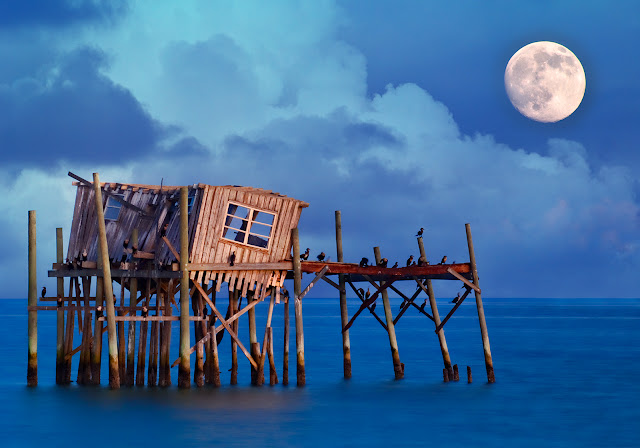
The first example started with an in-camera double exposure taken with my Nikon D3s in Cedar Key, Florida of an old fishing shack and the moon. There were no clouds in sight the evening I was shooting, so I added one of my favorite cloud textures later in Photoshop. 

Layering is very easy... 
  • Cmd/Ctrl A to select the texture layer. 
  • Cmd/Ctrl C to copy it.  
  • Cmd/Ctrl V to paste into the background document (your original image). 
  • Choose a Blend Mode to layer the two images together, such as Overlay or Multiply.
  • Tip - Hold down the Shift key and press the plus/minus key to scroll through blend modes. 
You can also drag the cloud layer over to your background layer, holding down the shift key to align the texture layer with your original image. I used the Transform tool to vary the clouds slightly in each of the photographs. Don't hesitate to modify a texture layer to suit your image. You can also rotate or flip your texture layer, alter the hue and saturation or convert it to black and white, adjust the opacity, anything goes!

The same clouds added a cinematic touch to this photograph taken in St. Augustine. One of the colorful filters in Nik Color Efex Pro accentuated the gold tones throughout the image. The same clouds were added to the landscape image below which creates a pastel look in a previously empty sky.

For fun, I added the same layer of clouds to create a stormy sky look to the airplane image below. The image was converted to black and white with Nik Silver Efex Pro 2. The clouds here look very dramatic having more contrast compared to the landscape example. To give you an idea of what you might photograph to create your own textures, I've included a few screenshots at the end of this post. You can also start your collection right way by using my favorite Flypaper Textures. I also cover textures in the classes I teach at BetterPhoto.com, both Enhancing Images and also Infrared Photography. Hope you can join me next month. Classes start June 8th, I hope to see you there! Make great pictures... ~ Deb  


Tuesday, February 1, 2011

Shine on...Star Trails at Rocky Mountain National Park

Yeah, we all shine on, like the moon, and the stars and the sun. ~John Lennon

Rocky Mountain National Park is one of my favorite locations to photograph. Everything changes dramatically with the seasons, and at night, it's absolutely beautiful! This was taken a few days ago on a very clear and cold night at an overlook I like to shoot from. There were countless stars in the night sky, and I saw a few shooting stars as well. Lenticular clouds filled the sky earlier in the day that were amazing, including this one last cloud that stayed for hours. 

This image is the result of about 45 exposures  using Interval Timer Shooting with the Nikon D3 and Nikon 14-24mm lens. The images were stacked in Photoshop CS5 Extended using Image Statistics. One of my longtime favorite filters, Nik Color Efex Pro Glamour Glow added subtle softness and saturation to the image. 

Interested in night photography? Please join me in St. Augustine, Florida this April at Florida's Birding & Photo Fest. I'll be leading a couple of fun workshops on nighttime photography, and don't miss my presentations on HDR, Creative Photography, and Infrared Photography too! Hope to see you there!  ~Deb


Tuesday, January 25, 2011

Creativity with Nik HDR Efex Pro - Upcoming Webinar


Please join me for an exciting webinar on February 16th at 5:00pm EST with Nik Software: Creativity with Nik HDR Efex Pro! I'll be sharing tips and techniques to create inspirational HDR images through multiple and single image HDR processing with landscapes, cityscapes, and more!

The art and technique of HDR allows the photographer to create dramatic story-telling images. From illustrative to photorealistic, you are the artist when it comes to how you wish your HDR image to be defined!

The process of shooting a scene and merging the images through HDR Efex Pro is easily accomplished, revealing incredible detail, color, and definition throughout the highlight, mid-tone, and shadow areas. One of the great qualities of Nik HDR Efex Pro is the ability to use control points to make targeted adjustments to select areas. This is a huge plus for the photographer working with HDR images. 

This is the first in a new series with BetterPhoto.com and Nik Software! I hope you'll join me to see how easy it is for the novice to the professional to easily create beautiful HDR images.  You can download a 15 day free trial from Nik Software, and use coupon code DSANDIDGE for anything Nik. Follow this link to sign up! Hope you can join me! ~ Deb

Friday, January 21, 2011

A new day... a new beginning... and a new webinar with Nik Software!


Sunrise on the beach, what a wonderful way to start the day. Watching the sunrise makes anything seem possible. It's a brand new day - you own it! I grew up on the east coast of Florida, each sunrise is like a poem to me.

What do you need to capture a sunrise? A tripod, cable release, and a graduated neutral density filter can be helpful balancing light in the composition. The sky can be most expressive before the sun actually rises, a tripod is key here. Clouds can make all the difference. Cinematic clouds add drama, an empty sky doesn't have quite the same impact. In that case, the waves and shoreline can be the main subject.

Polarizers work well to darken a blue sky and to reduce glare. Nik Color Efex Pro has a polarizer filter, while it doesn't reduce glare, it works beautifully creating the effect elsewhere as you see here. I also used Viveza on selected areas, so easy to do! (You can use DSANDIDGE your coupon code for anything Nik). Experiment with a few ideas and see what works for you!

Please join me for a webinar with Nik Software! I'm very excited about this, I'll post more soon. Here is a direct link to sign up for the BetterPhoto.com Series: Creativity with Nik HDR Efex Pro. I hope to see you there! ~ Deb

Saturday, October 9, 2010

Revisiting Favorite Locations - Indian River Lagoon...


The Indian River Lagoon is one of my favorite locations. I first photographed it in infrared, and it later became the cover of my first book, Digital Infrared Photography published by Wiley. This stand of palms overlook the Indian River Lagoon on the east coast of Florida where I grew up. I like to revisit old locations, and see how I can interpret a familiar subject in a new way. Time of day made the big difference here. I shot well after sunset while there was still an orange glow along the horizon, and just before twilight took over the sky. I used a tripod, and remote cord for the long exposure, and set my white balance to Cloudy to accentuate the warm colors. Nik Color Efex Pro Graduated filters added a touch more blue to the sky. Make great pictures!

Coupon code for Nik Software - DSANDIDGE